آموزش ساخت ایم بات
آموزش ساخت ایم بات
با پایتون
در این مقاله به آموزش ساخت ایم بات می پردازیم.
از زمان پیدایش اینترنت هکرها سعی می کنند اطلاعات خود را بروز نگه دارند تا به هدف خود برسند
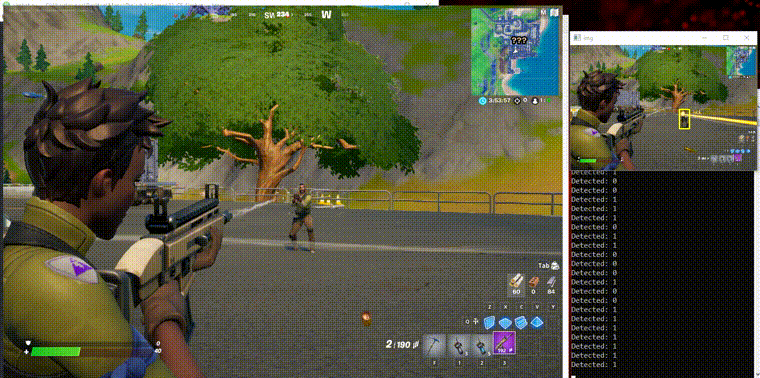
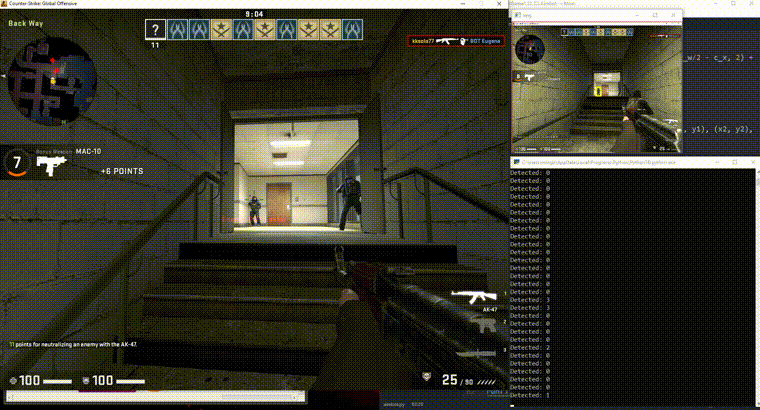
همانطور که می دانید بازی های آنلاین از سیستم آنتی چیت استفاده می کنند و سعی میکنند هکرها را از بازی دور نگه دارند ، ولی حقیقت این است که هکرها بروز هستند و نهایت راه و باگ برای نفوذ پیدا می کنند.
یکی از راه هایی که میشود برای بازی های آنلاین و افلاین ایم بات ساخت استفاده از برنامه نویسی پایتون می باشد.
برای شروع شما نیاز به یک هاب دارید تا بتوانید سیستم آنتی چیت را دور بزنید.
هاب پیشنهادی ما :
Tensorflow Hub
ابتدا کتابخانه مربوط به پیکس بات و هاب را اضافه می کنید.
- import win32gui
- import win32ui
- import win32api
- import numpy as np
- import cv2
- import pyautogui
- import random
- import time
سپس با این دستورات برای انمی باکس میسازیم:
- # Create a bitmap object
- bitmap = win32ui.CreateBitmap()
- bitmap.CreateCompatibleBitmap(hdc_source, width, height)
- hdc_mem.SelectObject(bitmap)
بعد از ساخت باکس شما باید فاصله انمی هارو تشخیص بدید:
- # Load the template image
- template = cv2.imread(“agent_template.png”, cv2.IMREAD_GRAYSCALE)
- etc….
- # Define the mouse movement parameters
- min_distance = 20 # minimum distance to move the mouse
- max_distance = 50 # maximum distance to move the mouse
- min_duration = 0.1 # minimum duration of the mouse movement
- max_duration = 0.3 # maximum duration of the mouse movement
و در آخر شما برای ساخت ایم بات باید حلقه ایجاد کنید و با استفاده از این دستورات می توانید خط خود را اجرا کنید
- while True:
- # Copy the game window to the bitmap object
- hdc_mem.BitBlt((0, 0), (width, height), hdc_source, (0, 0), win32con.SRCCOPY)
- # Get the bitmap data as a 3-dimensional numpy array
- bitmap_data = bitmap.GetBitmapBits(True)
- image = np.frombuffer(bitmap_data, dtype=np.uint8).reshape(height, width, 4)
- # Extract the red channel from the image and apply the color threshold
- red_channel = image[:, :, 2]
- red_pixels = (red_channel > red_threshold)
- # Check if there are any red pixels
- if red_pixels.any():
- # Perform template matching on the captured image
- screenshot_gray = cv2.cvtColor(image, cv2.COLOR_BGR2GRAY)
- result = cv2.matchTemplate(screenshot_gray, template, cv2.TM_CCOEFF_NORMED)
- # Get the best match location
- min_val, max_val, min_loc, max_loc = cv2.minMaxLoc(result)
- # Check if the best match is above a certain threshold
- threshold = 0.8
- if max_val > threshold:
- # The agent was detected, move the mouse cursor to the location
- x, y = max_loc
- # Randomize the mouse movement
- distance = random.uniform(min_distance, max_distance)
- angle = random.uniform(0, 2*np.pi)
- dx = distance * np.cos(angle)
- dy = distance * np.sin(angle)
- duration = random.uniform(min_duration, max_duration)
- # Move the mouse cursor to the location with randomized movement
- pyautogui.moveTo(x+dx, y+dy, duration=duration)
- # Wait for a short time to simulate human-like behavior
- time.sleep(random.uniform(0.1, 0.3))
- else:
- # The agent was not detected
- print(“Agent not detected”)
- else:
- # The red pixels were not detected
- print(“No red pixels detected”)
توجه داشته باشید که هرچه سیستم شما قوی تر باشد، سرعت و دقت ایم بات شما بیشتر می شود. برای گرفتن ایم بات بهتر نیاز به زمان دارید و باید وقت بگذارید تا ایم بات دقیق و بی نقص داشته باشید و برای تکمیل کردن هم می توانید دستوراتی اضافه کنید که فاصله های نزدیک را ایگنور کرد چرا که ممکن کارکتر یا دست شما در بازی به عنوان باکس شناخته شود.